I now have my blogiversary pattern available as a full-size tiled pdf you can print at home.
Click here to download the tiled pattern.
Click here to download the instructions.
How to Print the Tiled Pattern
Supplies:
Computer and printer
scissors and/or craft knife
tape
straight edge
1. Download the pattern by clicking the link above and open in Adobe Reader.
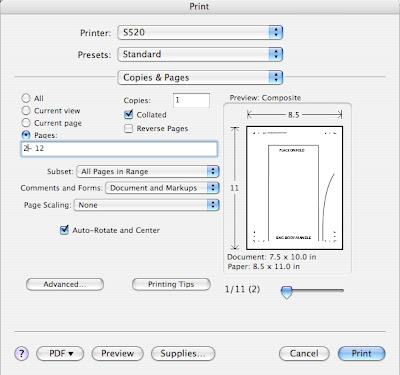
2. Choose Print from the File menu. Select the "Auto-Rotate and Center" checkbox. From the Page Scaling drop down menu, select "None." Print pages 2-12. (Page 1 is blank and doesn't need to be printed.)
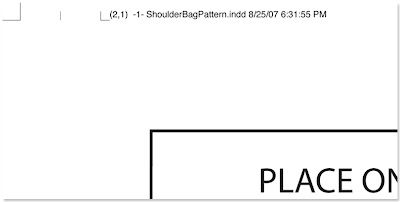
3. You now have 11 pages printed. Each corner of the pattern has crop marks to help you line up the pieces. The outside mark is the edge of the printed area. The inside crop mark is the edge of the overlapped area. The middle mark is where you will cut off the extra paper.
At the top of each page is a set of numbers such as (2,1). The first number is the column number. The second number is the row number. There are three columns and four rows of pages that make up this pattern. (Columns run up and down. Rows run side to side.) Use these numbers if you need help ordering the pages. Arrange the pages in order.
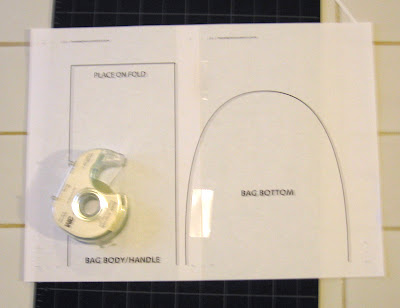
 4. To put the pages together, I started by making the rows. To start, cut off the excess paper on the right hand edge using the middle crop marks as a guide. Overlap the cut edge of the left hand page on top of the left side of the right hand page. Line up the cut edge with the middle crop marks on the right hand page and tape in place.
 5. When you have two rows put together, you can now join them. Cut off the bottom edge of one row. Lay the cut edge of the row on top of the second row lining up the cut edge with the middle crop marks. The lines of the pattern will also line up. Tape the pages in place.
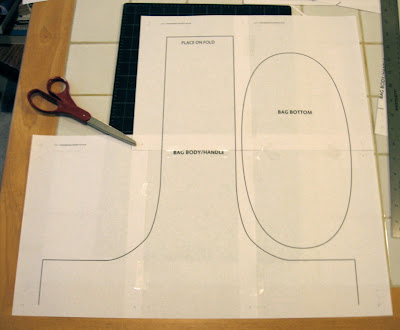
6. Continue with the remaining two rows. Cut out the pattern pieces along the lines. Secure any loose edges with tape.
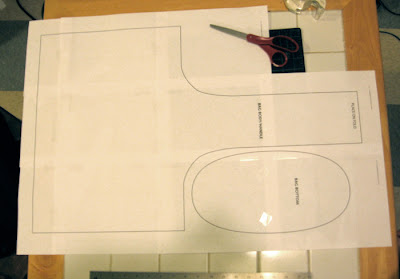
So, are you wondering how to make your own tiled pdf patterns? It took me a few days to figure out an easy way to do it using Adobe CS. I used Illustrator to draw the pattern and then InDesign to create the pdf. If you don't have InDesign, an alternate method is posted here on BurdaStyle.com. I'll post a tutorial on my method soon.
Click here to download the tiled pattern.
Click here to download the instructions.
How to Print the Tiled Pattern
Supplies:
Computer and printer
scissors and/or craft knife
tape
straight edge
1. Download the pattern by clicking the link above and open in Adobe Reader.
2. Choose Print from the File menu. Select the "Auto-Rotate and Center" checkbox. From the Page Scaling drop down menu, select "None." Print pages 2-12. (Page 1 is blank and doesn't need to be printed.)

3. You now have 11 pages printed. Each corner of the pattern has crop marks to help you line up the pieces. The outside mark is the edge of the printed area. The inside crop mark is the edge of the overlapped area. The middle mark is where you will cut off the extra paper.
At the top of each page is a set of numbers such as (2,1). The first number is the column number. The second number is the row number. There are three columns and four rows of pages that make up this pattern. (Columns run up and down. Rows run side to side.) Use these numbers if you need help ordering the pages. Arrange the pages in order.
 4. To put the pages together, I started by making the rows. To start, cut off the excess paper on the right hand edge using the middle crop marks as a guide. Overlap the cut edge of the left hand page on top of the left side of the right hand page. Line up the cut edge with the middle crop marks on the right hand page and tape in place.
 5. When you have two rows put together, you can now join them. Cut off the bottom edge of one row. Lay the cut edge of the row on top of the second row lining up the cut edge with the middle crop marks. The lines of the pattern will also line up. Tape the pages in place.
6. Continue with the remaining two rows. Cut out the pattern pieces along the lines. Secure any loose edges with tape.

So, are you wondering how to make your own tiled pdf patterns? It took me a few days to figure out an easy way to do it using Adobe CS. I used Illustrator to draw the pattern and then InDesign to create the pdf. If you don't have InDesign, an alternate method is posted here on BurdaStyle.com. I'll post a tutorial on my method soon.


